Tuesday, 29 September 2009

Holiday Open House Projects

Happy Tuesday, everyone! As promised here are the projects we did at the open house. The attendees got to make a Christmas card and a sweet treat cup spider card.

I got to tell ya that is not my spider card. Seriously, it is not mine. For the life of me I could not find my sample. This must belong to someone at the open house and they must have took mine by mistake. I don't think a spider have only legs. Anyway, my youngest got a hold of the treat card. lol She ate all the candies and also snip the corner of the card off. That little rascal. I had to refill the cup to take a picture.


The second one is a ornament card. They got to try the new Textured Impressions Folder Petals-A-Plenty from the Holiday mini. Also, they got to use the Delightful Decorations stamp set and the Ornament punch also from the Holiday mini.

Happy Stamping!
Deanna

Friday, 25 September 2009

Elegant Bouquet Birthday

Happy Friday! I had the Holiday Mini Catalogue open house today. My sister came and support me. I'm so thankful for her on going support since day one.

Today is a simple card with no ribbon. Can you believe it? No ribbon. Most if not all of my cards have ribbons. I think they look bare if there is no ribbon. Tell me what you think. My DH said it is fine the way it is.

Thank you for stopping by!

Happy Stamping!
Deanna

Thursday, 24 September 2009

Pocket Silhouettes

Happy Thursday! It still feels like summer here. Very warm and sunny which is unusual for Autumn in Vancouver.

A very elegant and simple card today. I used the Pocket Silhouettes stamp set to create this beautiful card. I embossed the Whisper White cardstock and then tear the edge. I sponge the edges of the Whisper White CS but it doesn't really show up on the picture. You can click on the picture for a closer look.

I tied a whisper white taffeta ribbon to the Whisper White CS and then mount it onto a Soft Suede CS card base. Next, I stamped three of the pocket silhouettes and mount them onto the Soft Suede CS. Then I mount them onto the card front with dimensional.

Hope you enjoy looking at this simple card and thanks for stopping by!

Happy Stamping!
Deanna

Wednesday, 23 September 2009

Another Look Of the Top Note Gift Card Holder

Happy Wednesday, everyone! Here is another gift card holder. I can't get enough of this gift card holder. You can see the tutorial here if you want to make it yourself.

Happy Stamping!
Deanna

Monday, 21 September 2009

Gift Ensemble

Hello, stampers! What do you think of this gift ensemble? I made this 3 weeks ago for a friend's birthday and I finally gave it to her on Sunday. She was away for awhile and came back on her birthday. I made her a journal that says "a friend loveth at all times" from the book of Proverbs 17:17a in the Bible. There was also a card and a pizza box with 8 note cards.

Here is the journal. I covered it with Rich Razzleberry cardstock and Cottage Wall DSP. Love this new DSP! My DH did the verse the computer and print it out for me. I then ran it through the Big Shot using the Top Note Die.


Close up of the beautiful butterflies. Aren't they pretty? I cut these butterflies out with the Bigz Beautiful Butterflies Die using the Big Shot machine.

Here is the inside cover. I was trying to cover the chipboard all around the holes for the wire and it was hard to open and close the cover. I had to cut it off so the cover can open and close better. I used the Spiral punch to punch the holes out.

Here is a close up of the butterfly bookmark.

A matching card.

Here is the pizza box that holds 8 mini 3x3 note cards.

Thank you for stopping by and have a great day!

Happy Stamping!
Deanna

Sunday, 20 September 2009

Punched Ornaments

Happy Monday! Aren't these cute? They are made from the Ornament Punch.

To make the ornaments simply punch 4-5 ornament punches. I use the retired DSP to make these. Fold them all in half length wise and glue them together. Make sure you put the elastic cord or ribbon in before you close the ornament up. I added Dazzling diamonds on the edges of the ornaments. It is pretty easy to do.

Thanks for stopping by and have a great day!

BTW- The ladies at the Friday's Christmas Cards Class (aka Stamp-a-stack) enjoyed the evening except they were not able to finished all 30 cards. But they did all that was needed to be done that night and will mount the card fronts to the card base at home. I feel so bad that it turned out that way. That was my crazy attempt for my stampers. They must think I was crazy and maybe I was. lol I made a tutorial for all 15 cards and the ladies was so happy for it and especially that they get to keep the tutorial to make some more cards on their own.

Happy Stamping!
Deanna

Friday, 18 September 2009

Another Top Note Gift Card Holder

Happy Friday, stampers! The Christmas Cards Class is tonight. I think it'll be fun trying to make 30 cards. I'm hoping everyone can finish in time. I'm kinda iffy right now. Never have a class making 30 cards before and it'll be a challenge. I'll let you know how it goes.

Anyway, here is another Top Note Die gift card holder. This time I use snowflakes stamp. Yes, another project with the snowflakes. lol What can I say! I love snowflakes!

Hope you all have a great day and thank you for visiting!

Happy Stamping!
Deanna

Wednesday, 16 September 2009

Merry Christmas Snowflakes

Happy Wednesday, everyone! Are you sick of my snowflakes cards yet? I still have more to show you until Christmas is here. lol

This is another card using the Serene Snowflakes stamp set from the Holiday mini catalogue. I just this year's mini. There are so many wonderful things in there. If you did not get a copy of the mini yet just let me know and I'll send one to you.

Supplies:
stamp- Serene Snowflakes, A Cardinal Christmas
papers- whisper white, night of navy
inks- brocade blue, basic black
accessories- taffeta ribbon, rhinestone brad

Thank you for visiting and have a wonderful Wednesday!

Happy Stamping!
Deanna

Monday, 14 September 2009

Square Scallop Card

Happy Tuesday everyone! I'm busy cutting for the Christmas Jingle Stamp-A-Stack Class this Friday. You can view the info here. I'm half way through preparing.

I made this card using the Scallop Square die. I fold the paper in half, line the folded side just below the scallop on one side and run it through the Big Shot machine. I decorate the card using the Serene Snowflakes from the Holiday mini catalogue. I love snowflakes so whenever Stampin'Up! comes out with a new snowflakes stamp set I'll get it for sure. I don't know what I'm going to do with them all but I just love them.

Supplies:
stamp- Serene Snowflakes, Teeny Tiny Messages
paper- melon mambo, whisper white, garden green
ink- garden green, bashful blue, whisper white craft ink
accessories- polka-dot ribbon, scallop square die, Big Shot machine, scallop circle punch, 1 3/4" circle punch, large and scallop oval punch

Thank you for stopping by and have a great day!

Happy Stamping!
Deanna

Top Note Gift Card Holder Tutorial

Hello, stampers! I have a tutorial for you today! A Top Note Gift Card Holder!

This is how the gift card will look like when it is done.

You'll need a 4 1/4" x 9 1/2" piece of cardstock. I use Real Red CS.

Score at 4 3/4" on the 9 1/2" side.

Fold on the score line and put it on the Top Note die just below the dotted line on the Top Note die. Run it through the Big Shot.

This is what it will look like after it is cut with the Big Shot and open up.

Line the folded line on the 3 1/2" line and cut the end off as shown above. The cut part will be the front of the gift card holder.

Sponge the edges in Chocolate Chip ink.

I sponge the back piece too.

Using a slit punch, line it up the middle at the top of the back piece, put it in as far as possible of the gift card holder and punch.


This is how it looks like after it is punched. This is where you will slip the gift card and the front of the holder through.

Use a jumbo brad to mark a placement to punch the hole. Mark it just above the punched slit.

Punch a hole using the biggest hole on the Crop-a-dile.

Use the Crop-a-dile to set the jumbo eyelet.

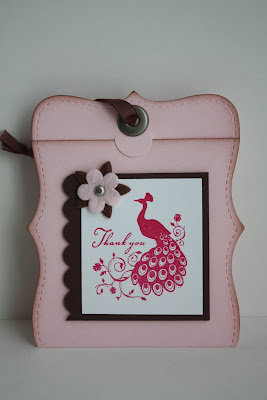
Put a ribbon through the brad. Decorate the front of the gift card.

Inside of the gift card holder.

This is how it look like when open.

It will be nice to hang these tags on a Christmas tree.

Hope you enjoy my tutorial. If you have any questions about the tutorial you can leave a comment here or email me at mrstam007@gmail.com.

Happy Stamping!
Deanna

Friday, 11 September 2009

Embossed Best Wishes

Happy Saturday! Today's card I use the embossing folder Elegant Bouquet. It sure is elegant! I use a sponge dauber and lightly sponge the bouquet in Pretty In Pink ink. Very easy! Not much you need to do with this card and it look so nice.

Supplies:
stamp- Kind and Caring Thoughts
paper- whisper white, pink pirouette
ink- pretty in pink, basic black
accessories- Elegant Bouquet Embossing Folder, sponge dauber, corner rounder punch, organza ribbon

Happy Stamping!
Deanna

Wedding Sweet Congratulations Card

Happy Friday, everyone! I can't believe it is Friday already! Time sure fly by fast this week.

So far my kids are enjoying their back to school days. My son finally love school. He get excited every morning to start his school and finish it on a timely manner. I'm so happy that he is enjoying school. My daughter always love school and wants to be a teacher when she grows up. My littlest one is learning colours and shapes. She very good with the shapes but not so much with colours yet. That's alright! She's only 2 going to 3 in two months. She just wants to do school like her brother and sister.

Today's card I use the Wedding Sweet stamp set I got for my sister's coming up wedding and that is a year later. But I'm happy I got to play with a new stamp set. Any excuse to buy new stamps. lol I stamp the flower image and sponge the middle of each flowers. I then put dazzling diamonds on and it made it look so beautiful.

Thanks for stopping by and have a great weekend!

Happy Stamping!
Deanna

Tuesday, 8 September 2009

Album In A Box

Happy Tuesday! Today is first day of school for Canadians. That just mean less time for me to stamp. But kids are ready to be back doing school again.

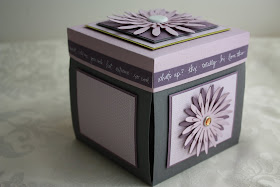
I made this album in a box using the 2 Sweet (retired) Simply Scrappin' Kit. I love the colour combo of this kit. Green and purple was never the colours I would pick for cards or anything but I learn to love these 2 colours now. They are so pretty together. The photo above shows the sides of the box. One side of the box have the daisy and 3 sides of the box are plain for putting photo there.

This is how it look like when you open up the box. Isn't it cool? I have not put any photo in yet but I think it'll look really great when it is done.

Happy Stamping!
Deanna

Monday, 7 September 2009

Birthday Gift For Francis

Happy Labor Day everyone! Hope all are enjoying your little long weekend before school starts! I probably wont go anywhere today as I need to get everything set up for home school for Tuesday and I'm no near to it.

I made this set of cards and an album for my oldest nephew who just turned 16. I wanted to give him a gift that is special and not just a Chinese red envelope with money in it. I made a little album that he can put photos from when he was born till he is 16.


Here is the front of the album. I filled the inside of the album with 16 clear envelopes for photos. You can get the directions here for the album.

I made 2 cards and I ended up giving him this one.


I'll save this card for another birthday boy.

Supplies:
stamp-lots of bots
paper-basic black, whisper white, basic gray, non SU CS
ink- basic black
accessories- grosgrain ribbon, jumbo eyelets, Harlequin Texturz Plate, Big Shot Machine, piercing tool, mat pack, dimensional, silver brads, Crop-a-dile, 1/2" circle punch, 1" circle punch, 1 3/8" circle punch, word window punch, large oval punch, scallop oval punch, hodgepodge hardware

Thanks for stopping by!

Happy Stamping!
Deanna