Happy Monday, everyone! Hope you all had a great weekend and a wonderful Thanksgiving (for the Americans)! It was wet and rainy here so it wasn't fun to go out anywhere.
Today's projects are little treat holders made from the Two Tags Bigz Die. Each holder was made with two of the bigger tags tape together. I tried two different kinds of ribbons to tie it together. The one with the 1-1/4" Striped Grosgrain Ribbon almost over power the treat holder hiding it. It still looks nice though.
Thank you for stopping by!
Supplies:
stamps- Christmas Punch, Holiday Best, Season's Of Joy
papers- real red, chocolate chip, whisper white, Christmas Cocoa DSP
inks- real red, chocolate chip
accessories- polka-dots ribbon, 1 1/4" striped ribbon, Two Tags Bigz Die, Ornament punch, Scallop Oval punch, Dazzling Diamonds
Happy Stamping!
Deanna
Monday, 30 November 2009
Friday, 27 November 2009
Scallop Square Felt Gift Card Holder
Hello, everyone! Had a great time last night at the Big Shot workshop. The ladies made three projects and one I posted yesterday. The other two projects are a square card here and the Top Note gift card holder here but with Dasher stamp image.
I made this holder as a sample to what other materials they can use in the Big Shot machine.
It was a very simple holder to make. I hand stitched the two square dies together with linen thread. I really like how this turned out. This is great card holder to give to someone and they can hang it on a Christmas tree. You can also put candies or chocolates.
Thank you for stopping by and I hope you enjoy today's project!
Happy Stamping!
Deanna
Embossed Christmas Tree
Happy Friday, stampers! Today's card is a card made using the Petals-A-Plenty Textured Impressions Folder from the Holiday mini. I CASE this card from Patty Bennett.
A customer asked me to hold a Big Shot workshop for her and her friends and this is one of the technique I'll be showing them tonight.
Want to host a Big Shot workshop? Invite some friends over at your house or mine and I'll gladly show you all the wonderful things you can do with a Big Shot. Email me at mrstam007@gmail.com to book a Big Shot workshop.
Thank you for stopping by and have a great day! Happy Thanksgiving to all my American readers!
Happy Stamping!
Deanna
Tuesday, 24 November 2009
Kind Thoughts Brocade
Hello, everyone! Another projects using the Kind Thoughts Brocade stencil. This time I did it on a chipboard album. This makes a great stocking stuffer for those stamping friends or family. The recipient can put their wonderful Christmas pictures they're taking this season.
I cut the chipboard out on the Big shot using the Scallop Square Die. Sponge the cover and back of the chipboard with Chocolate Chip ink. You can cover the chipboard with DSP if you like. I did heat embossing on the cover instead of the paste I used for the tile. The Poly filla paste works great on the chipboard also but I didn't do it here.
Here is the inside cover. I glue the Bella Blue DSP onto the chipboard and die cut them together. I also sponge the inside of each pages. It look really nice with when the photos are in.
Supplies:
stamp- Teeny Tiny Wishes
papers- kraft, chocolate chip, Bella Blue DSP
inks- chocolate chip, Versa Mark
accessories- scallop square die, big shot, Crop-a-dile, jumbo brad, wide oval and oval punches, designer label punch, sponge, 1" double-stitch grosgrain ribbon
Happy Stamping!
Deanna
Monday, 23 November 2009
Holiday Extravaganza Blowout Sale!
For one week only from Nov. 23-Nov. 30 you can order selected products from 30% to 50% off. What a deal! Perfectly in time to get some Christmas shopping done. You can click here to see the details! You don't have to order online. You can Email me at mrstam007@gamil to place your order.
Birthday Gift Set
Hello, everyone! Hope you are having a wonderful day! Isn't the card and the box gorgeous? I made the flowers from the scallop circle punch.
Here is a close up of the card that matches the box.
Here is close up of the box. It is a great little box to put jeweleries, chocolates, homemade cookies or anything that will fit in there to give as gifts. The great thing about this box is the recipient just slide the bow off the box and enjoy what's inside. A lot of people doesn't know how to retie the ribbon and they get disappointed when they can't recreate/retie the bow the way it came in.
Have a great day and thank you for stopping by!
Supplies:
stamp- Teeny Tiny Wishes
papers- whisper white, melon mambo, old olive, razzleberry lemonade DSP
ink- old olive
accessories- melon mambo polka-dot ribbon, (oval, large oval and scallop oval punch), scallop circle punch, little leaves sizzlits die, Big Shot, scallop edge punch, corduroy buttons
Happy Stamping!
Deanna
Friday, 20 November 2009
Stencil Tile
Happy Friday, stampers! Today's project is decorative tile. I used the stencil Kind Thoughts Brocade (S) found on p.29 from the Definitely Decorative brochure for the design on the tile. If you've never use stencil before you gotta try it out. It is actually a very easy and fun product to use.
Others use stencil paste to do the stencil design but I can't find it here in Canada. I use the paste called Poly filla . It is a filler for filling holes in your walls. You can find this product at any hardware store. I bought mine at Home Depot.
It took half a day for the paste to dry cause my house is so humid. I'm sure it dry faster than that. After it drys I sponged Chocolate Chip and Bashful Blue inks to the design. Then added glitter to the design. Isn't this tile beautiful? The hard part is find really nice tiles. I don't like it when there are so many holes in them.
Thank you for stopping by and have a great weekend!
Supplies:
stamp- Fresh Cuts
papers- kraft, whisper white
ink- chocolate chip, bashful blue
accessories- tile, Kind Thoughts Brocade stencil, Poly filla paste, Dazzling Diamonds, 1" double-stitched grosgrain ribbon, rhinestone brad, jumbo brad, linen thread, sponge
Happy Stamping!
Deanna
Wednesday, 18 November 2009
Merry Christmas Reindeer
Another post for today. The scallop piece was a tag to begin with but ended up to be a card instead. What do you think? I really like how it turned out. I used the Scallop Circle #2 die and the Coluzzle Cutting System for the tag. I didn't really like the big gap between the 2 circles so I cut free hand the whisper white piece smaller after I cut it with the Coluzzle. I really should get the Circle Scissor Plus so I can get the circle very close together.
Supplies:
stamps- Winter Post, Serene Snowflakes, Delightful Decorations
papers- whisper white, real red, chocolate chip, Christmas cocoa DSP
ink- chocolate chip
accessories- #2 circle scallop die, Coluzzle Cutting System, 3/4" and 1" circle punches, scallop edge punch, Corp-a-dile, 1 1/4" striped ribbon, linen thread
Happy Stamping!
Deanna
Blog Awards
Happy Wednesday, everyone! I received these two blog awards from Helen. Thank you so much for the awards! Visit her blog! She does an amazing quilling on cards! They are all so beautiful!
Happy Stamping!
Deanna
Happy Stamping!
Deanna
Tuesday, 17 November 2009
Treat Cup Gift Card Holder
Happy Tuesday, everyone! What a mouthful for my title, eh? I made this treat cup gift card holder just for fun. I made it for Thanksgiving. One of my customer came over last night to stamp with me and I showed it to her. She love it so much so I gave it to her. She was so happy to receive it. She stayed pretty late cause we had so much fun stamping we forgot it was so late.
If you would like to make this holder you can find it here. The tutorial doesn't show you how to put the treat cup though just the gift card holder.
Have a great day and thanks for stopping by!
Happy Stamping!
Deanna
If you would like to make this holder you can find it here. The tutorial doesn't show you how to put the treat cup though just the gift card holder.
Have a great day and thanks for stopping by!
Happy Stamping!
Deanna
Monday, 16 November 2009
Happy Birthday Hope!
My baby Hope's birthday is today and she's not a baby anymore! She turns 3. She wanted her nails done on the day of the party. So grown up like.
Got the same birthday cakes for Faith and Hope and it was yummy. We ordered the cakes at Pine House Bakery. It is a local bakery here in Vancouver. I prefer Golden Days Bakery but it was too far for us.
Have a wonderful day and thank you for stopping by!
Deanna
Got the same birthday cakes for Faith and Hope and it was yummy. We ordered the cakes at Pine House Bakery. It is a local bakery here in Vancouver. I prefer Golden Days Bakery but it was too far for us.
Have a wonderful day and thank you for stopping by!
Deanna
Sunday, 15 November 2009
Happy Birthday Faith!
Faith birthday is today! She turned 7. We had a party with families for her and Hope on Saturday. Hope's birthday is tomorrow.
Here are the photos of the baskets I made for them to give away at the party.
I used the same Perfect Setting die also to make tiaras for them. Hope was excited when I was making them but when the day came she didn't want to wear it.
Here is a photo of Faith wearing the tiara. She loved it!
Have a great day!
Friday, 13 November 2009
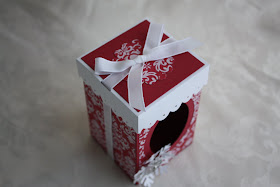
Red Window Treat Box
Happy Friday, everyone! Cute little box isn't it? I used the Christmas Cocoa DSP that can be found in the Holiday Mini and I love this red paper. The design part have a flock feel to it and it is so pretty. And guess what? No stamping to be found on this project! I could've stamp a sentiment but I didn't. Not sure where to put it.
You can find the tutorial to this box here.
I made the lid with the Square Bigz Die. I used the Horizontal Slot punch to punch the holes for the ribbon to slide through. I fold the flap then put the punch only half way in and punch. This makes the hole not so big.
I punch two snowflakes with the Jumbo Snowflake punch and put them together with the Filigree Brad. I adhere the snowflake with a glue dot and then curl the snowflake ends of one of the snowflake. Hope this inspire you to go and make one. It is really fun to make!
Thank you for stopping by and have a wonderful weekend!
Supplies:
papers- riding hood red, Christmas Cocoa DSP, whisper white
accessories- taffeta ribbon, filigree brads, Coluzzle Cutting System, scallop circle punch, jumbo snowflake punch, horizontal slot punch, 1/16" circle punch, glue dot, square bigz die, big shot
Happy Stamping!
Deanna
Thursday, 12 November 2009
Shimmering Trees
Happy Thursday, everyone! I made this card using reinker and Shimmer Paint found in the mini catalogue to stamp the image. It is really cool technique that Andrea Walford created.
To do this, I add two drops (more if you like) of the Frost White Shimmer Paint and two drops of the Soft Suede reinker. Mixed it together with a skewer. Then used a sponge dauber to pick up the paint and dab it onto the rubber stamp. When I finished dabbing the stamp with the shimmer paint I then stamped the image onto a Whisper White cardstock. That's it to it! No layering to this card at all. Very simple to do. The camera doesn't really pick up the shimmer but it is very pretty IRL.
Have a great day and thank you for stopping by!
Happy Stamping!
Deanna
Tuesday, 10 November 2009
Perfect Setting Basket
Happy Tuesday, everyone! Today's projects is a little basket I made using the Perfect Setting Bigs Die that was one of the Deals of the Week promotion last month. It is such a cute little basket!
I wasn't sure what to do with this die when I got it. I hardly make cupcakes so using this die doesn't work for me. I wanted something more practical than just for cupcakes so I made a base to go inside to make it into a basket. I just use whatever paper that was in front of me. Not a traditional Christmas colour as you can see. I love snowflakes so that was what I stamp this basket with.
To make the base of the basket I used the Coluzzle Cutting template that is retired. You can use the Circle Plus Cutter if you have one. I don't so I'm not sure what size of circle to use. I used the fifth circle from the middle. I then trace the basket bottom so I would know where to cut the notches to form the flaps. Then, I put adhesive around the inside the bottom of the basket and attached the base. The handle was the long straight piece that comes in the die.
Here is a picture of the basket without treats in it. Hope you like this little basket!
Thank you for stopping by! I'm making these baskets for my two daughter's birthday this weekend and I'll show you when I'm done.
Happy Stamping!
Deanna
Monday, 9 November 2009
I've Been iPick
Traditional Colours Season's Greetings Card
Happy Monday, everyone! Hope you had a great weekend! We didn't do much this weekend cause it rained everyday.
I made this card using the Serene Snowflakes stamp set. I wanted to do the snowflakes in red and it turned out great. There are still the white snowflakes on the background so it is still kind of a traditional Christmas colour card.
Thank you for stopping by and have a wonderful day! Come back tomorrow! I have something really cool to show you.
Supplies:
stamp- Serene Snowflakes, Snow Swirls
papers- whisper white, real red, old olive, Christmas Jingle DP
ink- real red, chocolate chip, whisper white (craft ink)
accessories- grosgrain ribbon, wide and scallop oval punch
Happy Stamping!
Deanna
Thursday, 5 November 2009
Merry Christmas Decorations Faux Tearing
Happy Thursday, everyone! Hope all having a great day today! It is rainy and windy here. All the leaves are falling like crazy. I'm glad I don't have to rake the leaves. the complex where I live hire someone to do the raking and they just did it on Monday.
For today's cards I did the "Faux Tearing" technique. It is an old technique but it is fun and easy to do. You take a post-it-note or a scrap piece of paper and tear it. Place it wherever you want on a piece of Whisper White cardstock and start stamping. I used Real Red and Garden Green inks for the background colours. I also did sponging with the same colours. When you are satisfy with the result then start decorating the card.
Thank you for stopping by and have a great day!
Supplies:
stamps- Delightful Decoration, French Script
papers- whisper white, garden green
inks- real red, garden green, chocolate chip
accessories- grosgrain ribbon, elastic cord, Ornament punch, sponge
Happy Stamping!
Deanna
For today's cards I did the "Faux Tearing" technique. It is an old technique but it is fun and easy to do. You take a post-it-note or a scrap piece of paper and tear it. Place it wherever you want on a piece of Whisper White cardstock and start stamping. I used Real Red and Garden Green inks for the background colours. I also did sponging with the same colours. When you are satisfy with the result then start decorating the card.
Thank you for stopping by and have a great day!
Supplies:
stamps- Delightful Decoration, French Script
papers- whisper white, garden green
inks- real red, garden green, chocolate chip
accessories- grosgrain ribbon, elastic cord, Ornament punch, sponge
Happy Stamping!
Deanna