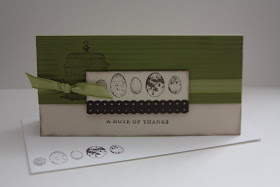
The Easter Blossoms tutorial is finally finish. Here it is!
You'll get step-by-step instructions on how to complete each of the cards and the special storage box.
If you are planning on teaching a class and want the group picture without my watermark to promote just leave me a message when purchasing the tutorial. I'll be glad to send you a photo without it.
The cost of this tutorial is $6.50. Click on the button below to purchase the tutorial.
Thursday, 31 March 2011
Wednesday, 30 March 2011
Light House Birthday Card
Happy Wednesday, everyone! Here is a masculine card I made using the Winds Of Grace stamp set which is retired. I love light houses and try to get every light house set that Stampin'Up! sells. There was one set I really like and never got it. I felt really bad I couldn't get that set and now I can't remember what it is called anymore.
Many of you, like me, struggle making masculine cards. I know how it feels. I'm not very good with it either. Men don't like frilly stuff on their cards so that makes it very hard to do. What can you put on a masculine card? Not much for sure. I did put some linen thread on this card. It does make the card looks a lot better then without it. Hope you got inspiration from this simple masculine card.
Thank you for stopping by! Have a great day!
Supplies:
stamp- Winds Of Grace, French Foliage
papers- basic black, very vanilla, first edition DSP
ink- basic black, whisper white craft
accessories- linen thread, word window punch, modern label punch
Happy Stamping!
Deanna
Monday, 28 March 2011
100,000 Hits Blog Candy
Happy Monday! What a beautiful sunny day here in Vancouver. Spring is so pretty with all the blossoms growing everywhere. God is so good to bless us with this wonderful day.
I'm so excited! I got 100,000 plus hits on my blog and I want to celebrate this special occasion. I'm so thankful for many of you for visiting my blog. I couldn't have done it without you. Your comments make my day and I really appreciate you taking the time to comment.
So to win this blog candy just simply leave a comment here telling me what you like to see me post on my blog. ie. more flower cards, 3d projects, kids card, masculine card etc.
I'll pick a winner on Sunday April 3. And guess what? Come back on April 3rd and find out what I have for you.
include in the blog candy- Stampin'Up! Dimensional, Dazzling Diamonds and a pack of assrt. 6" x 6" Designer Series Paper.
Have a good day!
Deanna
Friday, 25 March 2011
Because I Care Card
Happy Friday! Gloomy but a good day for me. I get to be by myself today and get to craft all day if I want. Kids are at my sisters' and the are so happy they get to sleep over at their cousins' house.
I made this card using the Nature Walk stamp set I got for FREE at the Vancouver Regional last month. I coloured the flowers with markers and stamp and then stamp off to give the lighter look to the flowers. The rest of the card is pretty much self explanatory.
Thank you for stopping by today! Have a wonderful weekend!
Supplies:
stamp- Nature Walk, Because I Care
papers-very vanilla, rich razzleberry, garden green, spring vintage DSP
ink- chocolate chip
accessories- markers, scallop circle #2 die, 3" circle die, 2-1/2" circle punch, kraft taffeta ribbon
Happy Stamping!
Deanna
Tuesday, 22 March 2011
Easter Blossoms Cards Class
Stylish Blogger Award
Wow! I feel so honored! I got this Stylish Blogger Award from these lovely ladies. Finally got around to thanking them. Thank you so much ladies! Here they are and make sure you go a visit them. They all do beautiful work.
Grace - Sugar Cards
Patti - What Are You Inking?
Patsy Waggoner - Patstamps
Deanna
Monday, 21 March 2011
Butterflies Congratulations
Happy Monday everyone! Today is a very wet day. I'm glad I'm a SAHM. Don't have to go out to work in this rainy day. All cozy inside and do some crafting.
Here is a card I made for the Bridal Shower tomorrow. Very simple one. There is no special technique or layout to it. I might make an album for the bride but I have no idea what her likes or dislikes or favourite colour. I only know her fiance. He's the pastor's son. Anyway, will have to get acquainted with her when they get marry.
Thank you for visiting my blog today! Have a good day!
Supplies:
stamp-Curly Cute
papers-crumb cake. whisper white, real red, summer sun, tempting turquoise, certainly celery
ink-chocolate chip
accessories-taffeta ribbon, eyelet border punch, beautiful wings embosslit, elegant bouquet embossing folder
Happy Stamping!
Deanna
Friday, 18 March 2011
Sew Suite Sewing Tins
Hello, everyone! Here are some tins that I altered using the Sweet Stitches Designer Series Paper and Sew Suite stamp set. I got these tins from my brother a few years ago and kept them to be use someday. They were filled with gum and they tasted awful and sticks to your teeth. Well, I finally altered them. They are so cute! These are perfect as gifts to people who likes to sew. They can carry it around in their purse to use when needed.
I was able to fit a pair of folded scissors, two rolls of threads, some buttons, two needles, and some snaps. I punched a piece of Rose Red card stock with a Modern Label punch and put two needles on it. After I did the Modern Label piece I realized that I should have made the needle holder in felt. Felt lasts longer than paper.
I'm selling these adorable tins. Sewing supplies NOT included. I only have a limited amount of tins so act fast if you are interest in getting some.
Set of 6 (all the Designer Series Paper you see on the above picture)
$24.00. Shipping to USA and Canada included.
Wednesday, 16 March 2011
Oh Sew Suite
Hello, everyone! Good day!
I've finally inked up my Sew Suite stamp set. I love the sewing machine! It is so pretty! Love this set! I think I say that with every stamp sets I own. And why not? That's the reason I became a Stampin'Up! demonstrator so I can get all or not most of the stamps in the catalogue. hehehe I made this card with someone in mind who love to sew.
Thank you for stopping by today! Have a great day!
Supplies:
stamp-Sew Suite, Curly Cute
papers-bajah breeze, whisper white, rose red, wild wasabi, Sweet Stitches DSP
acccessories-scallop trim border punch, crop-a-dile, scallop circle die #2, 3/8" early espresso taffeta ribbon, Coluzzle, makers
Happy Stamping!
Deanna
Monday, 14 March 2011
Bliss Butterflies Card
Happy Monday everyone! Hope you had a wonderful weekend!
Here is a card I made using the Bliss SAB stamp set. Love this set and it is FREE with every $60 you spend. Don't you just love FREE stuff? I sure do! Let me know if you need a SAB brochure and I'll send one to you or you can visit here to see it.
Supplies:
Stamp-Bliss
Papers-whisper white, bajah breeze, crumb cake, not quite navy, Springtime Vintage DSP
Ink-bajah breeze, crumb cake
Accessories-1/2" seam binding ribbon, 1-3/8" circle punch, scallop circle punch,
Saturday, 12 March 2011
Pink Bliss Note Book
Happy Saturday everyone! Hope you are having a wonderful weekend so far. My Family is out and leave me home all by myself. Really rare I get to be by myself after having kids. I get a lot done today and I'm very happy about it.
Here is a composition book I altered for a friend. Now I just have to mail it to her. She reads my blog so I'm not going to say who it is for.
I don't know her favourite colour so I hope she likes pink.
I put a rosette flower in the middle of the chocolate chip ribbon. The rest of the flowers I added half pearls to them. Love those half pearls.
Thank you for stopping by! Have a wonderful weekend!
Happy Stamping!
Deanna
Thursday, 10 March 2011
Ribbon Flower Tutorial
As promised here is the tutorial on how to make the ribbon flower posted here. It is very easy to make. Click on the photos for larger view.
You'll need a needle, thread and 7" length of ribbon of your choice. I used 5/8"wide satin ribbon.
ETA: Use a 18-20" length of ribbon to make a bigger flower.
Make a knot at the end of the thread and sew in from 1/4" of the end of the ribbon as shown above.
Make a running stitch along the edge of the ribbon. I did about 1/8" apart but you can make a wider stitches.
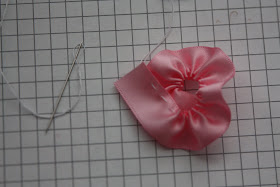
When you stitch to the end of the ribbon, pull the thread and gather the ribbon as shown above. The ribbon will curl when you gather the ribbon.
Put the 2 ends of the ribbon together as shown above.
Stitch the ends together as shown above. Tie a knot to finish the ribbon flower.
Here are different ribbon flowers I made using different kinds of ribbon. I used the Crumb Cake taffeta ribbon, the Pretty in Pink satin ribbon and the Chocolate Chip grosgrain ribbon. The satin ribbon is the hardest to work with cause it is slippery.
Well, hope you understand this tutorial. If you have any questions just email me or leave a comment here and I'll answer your questions asap.
Happy Creating!
Deanna
Wednesday, 9 March 2011
Vancouver Regional Project #4 No. 147 Card
Hello everyone! Hope you are having a good start to the week. Here is another project from the Vancouver Regional make n' take using the Nature Walk stamp set. We got this set for being at the event.
The card was actually going the other way from the sample in the instruction sheet. Well, the words on my Designer Series Paper went a different way so I made my card horizontal way instead. That day everything did not go well with my make n' take projects but I compromise (if that's the right way to say it) and make the best of it. What do you think of it? Do you like it. It was my first time playing with the Colour Spritzer Tool and I have no idea how to do it. Thankfully a fellow demonstrator helped me with it. I'm so hopeless.
Thank you for stopping by today!
Happy Stamping!
Deanna
Monday, 7 March 2011
Vancouver Regional Project # 3 A Note of Thanks Card
Good day everyone! Here is another project from the Vancouver Regional make n' take that uses the Nature Walk stamp set. This card took me awhile to make because I couldn't get the crimple (I don't think there is such word) or ripple look to the Old Olive cardstock. I had to borrow the Crimper from another demonstrator. I guess mine is broken. I tried to crimp the cardstock so many times it made a funny look to the bottom of the cardstock so I cut it off. I like how it turned out. You can't tell that there was something wrong with the card.
Thank you for visiting today! Have a great day!
Happy Stamping!
Deanna
Thank you for visiting today! Have a great day!
Happy Stamping!
Deanna
Saturday, 5 March 2011
Vancouver Regional Project #2 Thanks Card
Hello everyone! Here is another make n' take I made at the Vancouver Regional. I have schedule posts of the make n' takes I made at the Regional for you to look at over the course of the week while I work on my children's school work.
This card is a little note card with a ribbon rosette on it. It was a vanilla rosette that I coloured it with a marker. Then I used an aqua painter that filled with water and coloured the rosette again. Let it dry before I stick it onto the card. Nice isn't it? Love this technique.
Thank you for stopping by today! Have a wonderful weekend!
Happy Stamping!
Deanna
Thursday, 3 March 2011
Vancouver Regional Project
Happy Thursday! Hope you all are having a wonderful week so far. Here is one of the projects I did at the Vancouver Regional this past weekend.
A little note card holder. This is a great gift to give to your hostess.
Here is the inside of the holder.
Here are 4 note cards which fit snugly into the holder.
Thank you for stopping by today!
I have a lot of people asking me how I made the ribbon flowers for the altered note book I made here. I don't have specific time when will I be making a tutorial on how to make the ribbon flower. I have to send my kid's work samples to the teacher this week and I'm behind. Trying to gather them and scanning them is not the funnest thing to do. Anyway, just check back often for the tutorial.
Happy Stamping!
Deannna