Today is my birthday. Since it is a special day I thought I share a FREE tutorial with you. I finally finish it. It is very lengthy. Hope you like it.
I use the Petal Cone Die die cut pieces to make the box. Sorry, I don't have a template for this box.
Valentine Heart Treat Box and Card Tutorial
Materials:
(4) 4-1/4" x 5-1/2" card stock
1-1/2" x 9-1/2" card stock
1-1/2" x 9 card stock
Stamp
Petal Cone Die
Big Shot Die Cutting Machine
Paper Trimmer with Scoring Blade
12" Ribbon
Slot Punch or Crop-A-Dile
Sticky Strip
1.Die cut the (4) 4-1/4" x 5-1/2" card stock using the Petal Cone die. Picture above shows the pieces you'll need for this project. Set the 1 petal piece, the 2 half scallop circles and the banner aside.
2.Cut off the flaps of 3 of the petal cone die pieces. Set one petal piece aside.
3.Draw a line about 1/4" from edge all around one of the petal piece using a ruler and pencil.
4.Cut around the drawn line. This will be the inside of the box base.
5.Use the inside box base and lightly trace around onto another petal piece. This will be the box base. Set aside.
6.Stamp the 1-1/2" x 9-1/2" card stock and the 1-1/2" x 9 card stock pieces. These will be the box sides.
7.Score 1/2" on the long side of both pieces and 1/2" on the short side for both ends of the longer piece. The 1/2" scored parts will be the flaps for assembling the box.
8.Add sticky strip on the flaps of both pieces of card stock. Cut the corners of the longer pieces as shown in picture above.
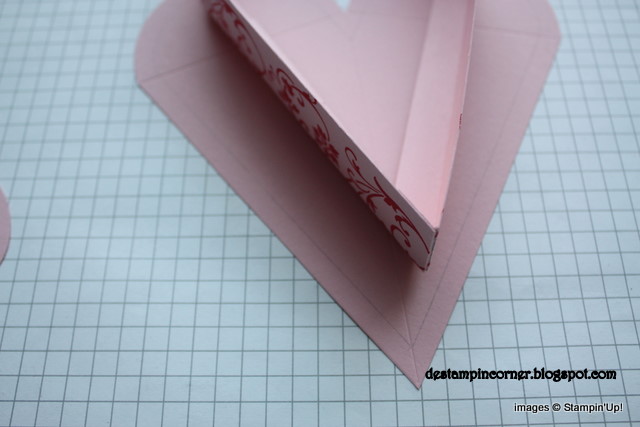
9.Working with the longer piece of card stock first. With the flap at the bottom, lay the card stock onto a ruler, starting cutting on the flap part at 4" and then cut every 1/4" after that all way to the other end of the card stock. The picture shows the cutting point.
10.Now work with the shorter piece of card stock. With the sticky strip at the top, lay the card stock onto a ruler, starting cutting on the flap part at 4" and then cut every 1/4" after that all way to the other end of the card stock.
11.This is how the 2 card stock looks like when you finish cutting the flaps.
12.Join the ends together making sure the 4" parts meet and the parts with the little 1/4" flaps meet. Snip at an angle on the part where the end of both 4" part meets.
13.This is how the box side looks like after they are joined. The "V" part will be the bottom of the box and the rounded part is the top of the box.
14.Punch a hole about 3" up from the bottom "V" of the box side using the Slot punch or the Crop-A-Dile before assembling the box side to the box base. The picture show the side already assemble to the base but it is harder to punch a hole this way. Trust me I know. It is easier to punch a hole before assembling the side to the base.
15.Assemble the box sides at the "V" first up to before the heart curves.
16.This is how the box side looks like after assembling the "V" part.
17.Now assemble the top of the box. Stick down the part where the 2 pieces of card stock meets first and then work with the 1/4" flaps pieces last.
18.Cover the inside of the box with the inside box base piece that was work on earlier. Now you have a heart box. Set aside.
19.Now take the last petal piece and emboss it or stamp on it. I emboss mine. You can see the stamped one
here.
20.Add sticky strip on the other side of the flap.
21.Adhere the embossed or stamped petal piece onto the petal piece with the flap cut off earlier.
22.Open up the joined petal pieces and stamped the inside. This will the card and lid of the box.
23.Cut the banner in half, score about 1" on both pieces and then add sticky strips.
24.Adhere the 2 banner pieces onto the back side of the card as shown in picture above.
25.Adhere the lid to the box. Make sure everything is line up.
26.Punch holes on the lid.
27.Tie the 12" ribbon through the hole and decorate the box. Enjoy!
"And now abideth faith, hope, charity, these three; but the greatest of these is charity."
1 Corinthians 13;13
Deanna


17 comments:
Beautiful box Deanna & a great gift idea!
WOW! This is beautiful and so creative. Thanks for sharing!
Happy Birthday D!
Love your blog, tutorials and this box!
Happy Birthday, Deanna! Hope you have a wonderful birthday! Thanks so much for the free tutorial. I'm going to try making this beautiful box today. Big Birthday Hugs!!
VERY NICE!!!!!! LOVE that you also have you sentiment in this too!!!! VERY CREATIVE!!!!!!!! :)
This is such a cute idea. TFS.
Love it, thanks so much for sharing!
Happy Birthday!!!! Hope you had a GREAT one!!!
Thank You so much for Sharing. I appreciate the work you put into your Tutorial. Thanks,
Faith
Happy Birthday! I love the heart box, it is beautiful! Thank you so much for sharing.
Happy Birthday! Beautiful box and thanks so much for sharing the instructions.
Gorgeous heart box!! Thanks so much for the tutorial. Hope you enjoyed a delightfully fun Birthday day! Pam
WOW!!! This is totally amazing and beautiful!! Thanks so much for the full tutorial too!! I will be featuring this project on My Crafty Picks #50 with a link back to your blog on 1-29-12. Make sure to stop by to check out all the picks!!
If you wish to decline please email me by responding to this comment to let me know.
And Happy Birthday too!!!
Thanks and take care
Tiffany Bauer
http://www.mycraftyworld.blogspot.com
Oh, WOW! Unbelievable! Gergeous! What a great idea!
I just love this. Just in time for Valentines. Thanks so much
hey girl,,this is a great love box,,,thanks i love ie,,
Wonderful idea, I could do this for a class this year!
Felicidades!! esta presioso y gracias x el tutorial :)
Post a Comment