Showing posts with label Ribbon Flowers. Show all posts

Wednesday, 8 August 2012

Vintage Christmas Ornament

Good day! Hope you are having a wonderful day! This summer seems to be busy for me. I'm hardly at home. I finally have the chance to create something.

I was so excited when Stampin'Up!  sent me the Holiday Mini Catalogue. I love the ornament on the cover so I ordered the Ornament Keepsakes Bundle that have the stamp set and the framelits when it was available to order.


I case the ornament on the cover of the catalogue. I did mine in kraft colour. I added the Scalloped Tulle Ribbon to the ornament. The rosette in the middle was made with satin ribbon and the tutorial can be found here. To make the ornament look pretty I added a pearl in the middle.

I'm going to make lots of these as Christmas gifts and maybe sell them too.

Thank you for stopping by!

"Thou art near, O Lord; and all thy commandments are truth."
Psalm 119:151

Deanna

Thursday, 19 July 2012

Wedding Day Wedding Card


Happy sunny Thursday everyone! It is such a beautiful today but too bad I had to stay inside to fix a big ball covering for Camp Y.E.S!


Here is a card I made awhile ago. Forgot to share it.

I made the flower using satin ribbon.  Something I learned to make long time ago.

Thank you for stopping by! Have a fabulous day!

Deanna


Wednesday, 13 June 2012

Wedding Essential

Guess what? I found the wedding creation pictures. They were in Martin's computer. I never thought they would be in his computer. I search and search on all the SD cards we got and they were not in any of the cards. I'm glad they were not deleted.

I made these wedding stuff for my brother's wedding. My SIL was very easy to work with. She's not picky at all. She's a sweetheart.


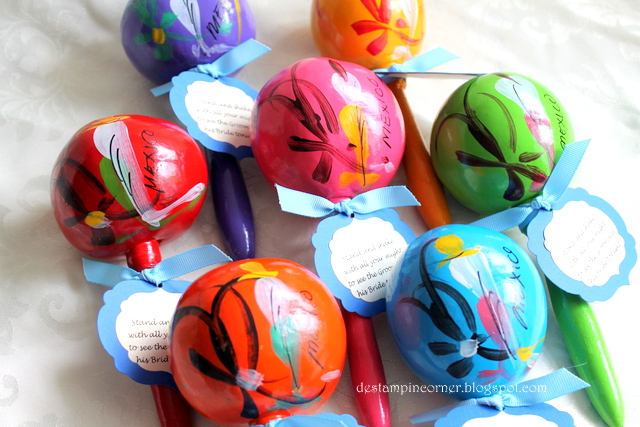
This is the picture of the menu card and a tag for the maraca. The tag said "stand and shake with all your might to see the groom and bride kiss tonight". I love it. It is so cute. One of my nephew really enjoy shaking the maracas.


This is the other side of the tag.


Colourful maracas favours.


This is the ring pillow I made long time ago for my wedding. I just changed the flower and ribbon to match their wedding colour.


This is the table number card.


This is the guest book. The frame piece on the book cover opens up and there is their picture inside.


Here is one of the pages inside the guest book. I put their wedding invitation and respond card in the guest book. Unfortunately I did not make the invitations.


Here is another page in the guest book. I added pictures to each pages and the guest can sign around them.

Hope you enjoy looking at the wedding stuff. I enjoy making them.

Thank you for visiting today.

Deanna

Thursday, 7 June 2012

Blessings Book

Good day! I made this set for my kids' piano teacher. This is her last year teaching them as she is going off to Bible college. We are happy for her new adventure and will miss her dearly. She's such a sweet girl. She has been a great blessing to us over the years. I remember her as a little girl when she first move here with her family as a missionary in Burnaby and now she's all grown up. Time sure flies. Here is their church website Metro Baptist Church if you are interest in knowing more about their church.


I made a card to match the book.


This is an altered composition book. I used one of my favourite colour combos to decorate the book.


If you would like to make the ribbon flower you can find the tutorial here.

Thank you for stopping by today!

"I will bless the LORD at all times; His praise shall continually be in my mouth."
Psalm 34:1

Deanna

Wednesday, 6 July 2011

Awash Flowers

Hello everyone! Happy Wednesday! Beautiful day today and warm too. So thankful for beautiful weather.
The above card is for a friend whose son passed away recently.  There is funeral this Friday.


I made a second card and not sure what sentiment to put on it.  The first card I added buttons to the flowers and the second card I did the twisted ribbon flower and added to the middle of the flower. If you would like to learn how to make the twisted ribbon flower click here.

I got this Awash With Flowers stamp set for FREE when I won the contest of Stampin' Success Magazine. It is a monthly magazine for Stampin'Up! demonstrators and it is filled with ideas and infos to help demos and a monthly contest that we can enter. Well, because of the Canada Post strike I have not yet receive my magazine and I'm dying to show you what project I've entered. If you are a demo you can view the magazine online on the demo website.

Here is a special over at Stampin'Up!


During July, you can join the Stampin' Up! family as a demonstrator for only $119! This limited time Starter Kit--valued at $205--comes with the following high-quality products:
$119 Starter Kit
  • Easy Events Clear-Mount Set*
  • Pennant Parade Wood-Mount Set*
  • Basic Black Classic Stampin' Pad®
  • Old Olive Classic Stampin' Pad
  • Pumpkin Pie Classic Stampin' Pad
  • Real Red Classic Stampin' Pad
  • Brights 8-1/2" x 11" Assorted Card Stock
  • Just Add Cake Designer Series Paper*
  • Chocolate Chip 1/2" Scallop Dots Ribbon*
  • Note Cards (20)
  • Clear-Mount Block C
  • Blender Pen (1)
  • SNAIL Adhesive®
  •  Business supplies

Thank you for stopping by! Have a good day!

Happy Stamping!
Deanna

Thursday, 7 April 2011

Twisted Ribbon Flower Tutorial

Good day everyone! Such a beautiful day here with sunshine and cool weather. Love it!

Here is a tutorial I promised to make. I guess most of you are visual type just like me. I know words just doesn't describe most things. Especially when it comes to paper crafting. So here it is.

Close up of the finished flowers.


You'll need matching colour 1/4" grosgrain ribbon, a 1-1/4" circle of So Saffron card stock (use a bigger circle if you want a bigger flower and if you are using a wider ribbon) and Sticky Strip or Sticky Sheet. Stampin'Up!'s Sticky Strip or Sticky Sheet works best with ribbon.


Cover the 1-1/4" circle with Sticky Strip or Sticky Sheet.


Remove the plastic of the Sticky Strip and stick the end of the ribbon in the middle of the circle. I leave my ribbon on the spool so I wont waste any ribbon. I hate wasting things so therefore I keep the left overs and now I have many, many scraps all over the place. That's kind of annoying too. Anyway, back to the tutorial.


Twist the ribbon (my youngest helped me hold the circle while I take a picture, you need two hands to do this ribbon flower).


Twist and wind the ribbon at the same time around the circle and pushing the ribbon down as you go to make sure the ribbon stick to the circle.


Here is more ribbon on the circle.


All covered up circle.


Snip the ribbon off.


Bring the ribbon end to the back and stick it down with a Sticky Strip.


Here is the finished flowers on a card. The bigger flower I used 1-3/4" circle and 5/8" grosgrain ribbon and the small flower I used 1-1/4" circle and 1/4" grosgrain ribbon.

Hope you enjoyed the tutorial. I'm going to link this card to So Shelli-blog Shelli Gardner CEO of Stampin'Up! April challenge.

Have a wonderful day and thank you for stopping by!

Happy Stamping!
Deanna

Tuesday, 5 April 2011

Ribbon Flowers Card

Hello everyone! How is your day so far? We got rain today but I'm not complaining. Rain is good for the flowers, the birds and everyone living on this earth. We all need water to survive. I think rain is good for people with pollen allergy. The pollen doesn't have a chance to fly around and attack them. lol


I finally tried to make this style of ribbon flower. What do you think? Very simple to make. I punch a round circle piece of card stock and add sticky strip to it. Next, use a seam binding ribbon, start in the middle, twisted it and wind it around the circle card stock. Keep the ribbon on the spool to get the length you need. If you cut it then it might be too short or too long. You don't want to waste ribbon if you don't need to. If you want to me to make a tutorial just let me know.

Thank you for stopping by! Have a wonderful day!

Happy Stamping!
Deanna

Saturday, 12 March 2011

Pink Bliss Note Book

Happy Saturday everyone! Hope you are having a wonderful weekend so far. My Family is out and leave me home all by myself. Really rare I get to be by myself after having kids. I get a lot done today and I'm very happy about it.


Here is a composition book I altered for a friend. Now I just have to mail it to her. She reads my blog so I'm not going to say who it is for.


I don't know her favourite colour so I hope she likes pink.


I put a rosette flower in the middle of the chocolate chip ribbon. The rest of the flowers I added half pearls to them. Love those half pearls.

Thank you for stopping by! Have a wonderful weekend!

Happy Stamping!
Deanna

Thursday, 10 March 2011

Ribbon Flower Tutorial

As promised here is the tutorial on how to make the ribbon flower posted here. It is very easy to make. Click on the photos for larger view.


You'll need a needle, thread and 7" length of ribbon of your choice. I used 5/8"wide satin ribbon.
ETA: Use a 18-20" length of ribbon to make a bigger flower.


Make a knot at the end of the thread and sew in from 1/4" of the end of the ribbon as shown above.


Make a running stitch along the edge of the ribbon. I did about 1/8" apart but you can make a wider stitches.


When you stitch to the end of the ribbon, pull the thread and gather the ribbon as shown above. The ribbon will curl when you gather the ribbon.


Put the 2 ends of the ribbon together as shown above.


Stitch the ends together as shown above. Tie a knot to finish the ribbon flower.


Here are different ribbon flowers I made using different kinds of ribbon. I used the Crumb Cake taffeta ribbon, the Pretty in Pink satin ribbon and the Chocolate Chip grosgrain ribbon. The satin ribbon is the hardest to work with cause it is slippery.


Well, hope you understand this tutorial. If you have any questions just email me or leave a comment here and I'll answer your questions asap.

Happy Creating!
Deanna

Saturday, 5 March 2011

Vancouver Regional Project #2 Thanks Card


Hello everyone! Here is another make n' take I made at the Vancouver Regional. I have schedule posts of the make n' takes I made at the Regional for you to look at over the course of the week while I work on my children's school work.

This card is a little note card with a ribbon rosette on it. It was a vanilla rosette that I coloured it with a marker. Then I used an aqua painter that filled with water and coloured the rosette again. Let it dry before I stick it onto the card. Nice isn't it? Love this technique.

Thank you for stopping by today! Have a wonderful weekend!

Happy Stamping!
Deanna

Sunday, 27 February 2011

Enjoy Life Altered Composition Book

Hello, everyone! No church this morning due to snow so here is a Sunday post for ya'll. Vancouver is NEVER ready when it snows. The city doesn't plow the streets fast enough. Sky train and buses are not running. Can't really get around even if we want to.
I live at the bottom of a hill so trying to get up the hill is not so easy. One year it snowed so bad and we tried to go places. Got stuck many times and at many places. Not going to try it this time.


Here is the altered composition book I made for my sister for attending the Regional with me. We had a great time learning and seeing new things. She love this book very much cause I made in her favourite colour.


Thank you for stopping by today!

Happy Stamping!
Deanna

Friday, 25 February 2011

Bliss Altered Note Book

Happy Friday everyone! I need a note book to take notes at the SU Vancouver Regional event on Saturday. It is a white note book (you can see it where the coil is) that I had for awhile and never decorate it. Finally decided to alter it.


I decorated the book with my favourite colours. I used Baja Breeze and Crumb Cake colours.


Here is a close up of the ribbon flowers I made. I gathered on one side of the ribbon with a needle and thread. I then put a pearl on each of the flower. I like how it turned out. I didn't use the pearl from SU. They were too small for my flowers.

I also altered a composition book for my sister to use at the Regional. She's not a demonstrator but she can use it to write others things she desire. I'll show you the book another day. Not quite finish.

Thank you for stopping by and have a wonderful weekend. I know I will cause I'll be at the Regional having fun.

Happy Stamping!
Deanna

Wednesday, 2 February 2011

Valentine Heart Baskets and My Health

Hi, everyone! I have not post for awhile. My kids and I were sick at different times so that keeps me from stamping. I'm glad we're all better now. I also had 4 baby shower gifts I had to make. I made 4 paint cans for the babies. I will not post them cause I posted so many of those baby paint cans on my blog. You can go to the 3D label section if you want to see them.

I went to see the doctor in the beginning of January. I told my doctor that my heart was pumping so hard during the the Christmas holidays. It happened two times and it was hard to breath. He sent me to get a blood test and the results came back that I'm anemic. That sure explains me being so tire all the time especially last year when I didn't stamp so much. I have been taking iron supplements for two weeks now. In March I'll go for another blood test to see if the iron pills work for me. Anyway, now that is said how about some stamping stuff.

Are you looking for Valentine ideas? Here are two heart baskets made from the Petal Cone Bigz L Die. I embossed them with the Perfect Polka Dots and the Vintage Wallpaper Embossing Folders. Gotta love those embossing folders.

I added the Build a Blossom flower to this basket.


I added ribbon rosettes to this basket. I made the rosettes from satin ribbons. Satin is harder to work with because they are so slippery. I used to make tons and tons of these rosettes for weddings. I used a stiffer ribbon for it.


Thank you for stopping by today! Have a wonderful day!

Happy Stamping!
Deanna